
Video Recording Guide
What we need from you
1. Short video of yourself speaking directly to the camera (Mandatory)
Video Interview (Bio & Artist Statement) (approx. 180 words)
Focus on your artistic vision, background, and key milestones (sample script below)
2. Images (Mandatory)
Please send a selection of high-quality images that represent you and your artistic journey:
Recommended Content:
You painting or working in your studio
Exhibition views (galleries, art fairs, installations)
Receiving awards or recognitions
Early or childhood images related to art (optional but powerful)
Image Requirements:
Minimum size: 2000 pixels (longest side)
Recommended: 3000–5000 pixels for best results
Format: JPG or PNG
Quality: High resolution, sharp, well-lit (avoid blurry or pixelated images)
The stronger and more varied your images, the more engaging your documentary will be.
3. Video Clips (Optional: Highly Recommended)
Video footage adds depth, emotion, and professionalism to your documentary.
Suggested Clips:
You painting or creating in your studio
Close-ups of your hands, tools, and materials
Observing or interacting with your work
Exhibition, awards or art fair moments
4. Artworks (Mandatory)
4 final artworks (to be featured in the video)
High resolution (minimum 2000px, ideally more)
Include: Title, Year, Medium and Dimensions
Important
The quality of your materials directly affects the final video
If you don’t have video clips, we can still create your documentary using images.
How to Film Yourself
Equipment Needed
Your phone (with camera).
A tripod (or something stable to hold your phone).
One of your paintings to hang or place behind you.
A quiet, well-lit space (natural light is best).
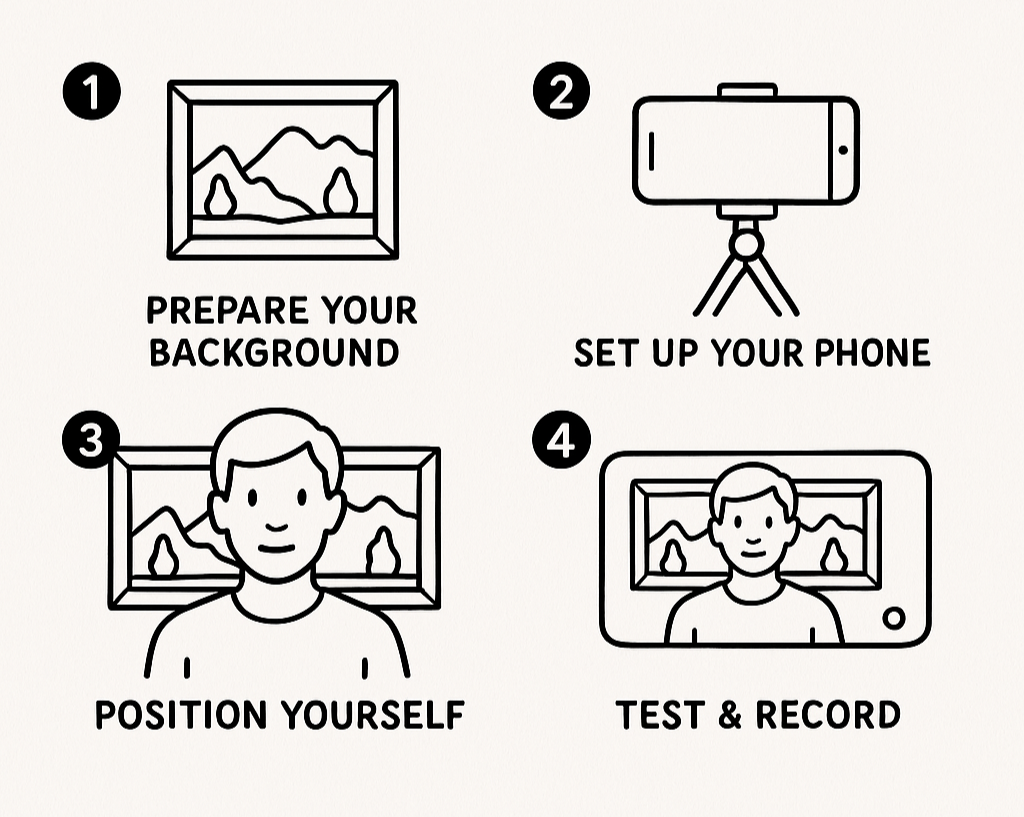
Step 1: Prepare Your Background
Place one of your paintings on the wall behind you.
Make sure it is centered and fully visible.
Keep some space around the painting so it doesn’t fill the entire screen.
Step 2: Set Up Your Phone
Mount your phone horizontally (landscape mode) on a tripod.
Place the tripod at about eye level.
Make sure the phone is stable (no shaking).
Step 3: Position Yourself
Sit or stand in the middle of the frame or slightly off-center.
Leave some space above your head (not cut off).
You should be in the foreground, but the painting should still be visible behind you.
Don’t sit too close to the camera—leave some space so the background is visible.
Frame: chest to head (medium shot) | Phone mic close: (1–1.5m max)
Step 4: Check Lighting & Sound
Face a window or light source so your face is well lit.
Avoid strong light directly behind you (it will make you look dark).
Record in a quiet space without background noise.
Step 5: Test & Record
Do a short test recording to check framing, sound, and lighting.
Adjust if needed (move the tripod, tilt the painting, add light).
When ready, press record and speak clearly.

Final Look:
Phone horizontal.
Artist centered but not filling the whole screen.
Painting behind, clearly visible.
Tripod stable, good lighting.
Recording Tips
❌ Avoid:
Looking down at camera
Too far away
Busy messy background
Echo rooms
Background noise (street, fridge, AC)
❌ Never:
Light behind them (silhouette)
Overhead harsh light
👉 Important:
Speak naturally
Not memorized
3–4 short takes
Original files (not screenshots)
Minimum HD quality
Please note that your presence on screen will not be continuous. Your recorded voice will often be used as voice-over (we will edit later).
✔ Submission checklist:
Short Video
4 artworks
Photos
Short Clips Video (Optional)
Recording Guidelines for Your Documentary
To create a coherent and compelling artist documentary, we ask you to record a short video of yourself speaking directly to the camera. This will form the narrative foundation of your film.
Structure of Your Speech
Your recorded video should follow a simple and clear structure:
Short Bio (2-3 lines maximum)
Briefly introduce yourself—your name, practice, and where you are based.Artist Statement (main section)
Expand on your work: what you explore, your themes, and your process.Personal Closing
End with a more personal reflection on what art means to you or why you create.
Your script should not exceed 180 words, allowing for a natural delivery and space for visual elements within the film.
Max. Length of your video interview: 90-100 seconds (180 words)
170-word script example:
I’m [Name], a [type of artist] based in [City].
My work began through [brief origin—childhood, studies, or a turning point], and over time it has developed into a practice focused on [main medium or approach].
I’m interested in exploring [core themes—memory, identity, material, landscape, etc.]. My work often reflects on [expand slightly—what questions you’re asking or what you’re observing].
I’m particularly drawn to [specific element: texture, color, repetition, gesture, narrative…], because it allows me to [what it does conceptually or emotionally].
In my process, I usually [describe briefly how you work—layers, time, experimentation, research, intuition]. This process is important because it shapes how the final piece holds meaning.
More than representing something directly, I see my work as a way to [deeper intention—evoke, question, translate, challenge…].
For me, art is a way of [final personal reflection—understanding, communicating, resisting, remembering].
Please note that your presence on screen will not be continuous. Your recorded voice will often be used as voice-over, while the film transitions between: Images from your career (studio, exhibitions, archival material), Video footage (if available) and Detailed views of four selected artworks